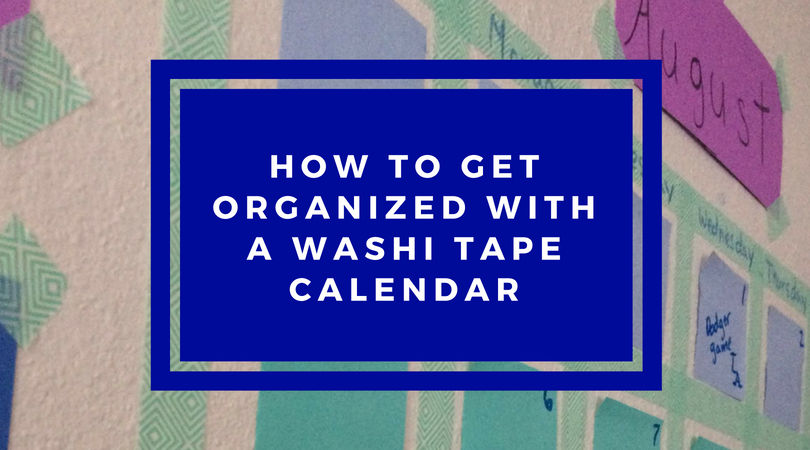
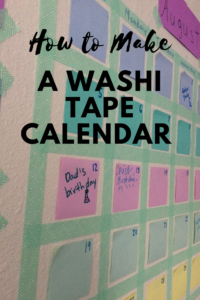
How to Make a Washi Tape Calendar
I love the idea of a big calendar on the wall. It is so perfect for being able to see your major events for the month right in front of you. In a classroom, a calendar is important to so that kids know what day it is, and it is the main part of any morning meeting.
However, most of the big calendars that I see are more permanent, especially those which can be found in home offices. This presents a problem for people who are renting their homes and cannot paint, hang things on the walls etc. I recently wanted to put up a calendar in my room/office, but there is no way that I would be able to paint a patch of chalkboard. I saw some chalkboard contact paper, but I feared that would be hard to remove.
That is when I got the idea to make a post-it note, washi tape calendar. After reading this article, you will also be able to create this cute way to keep yourself organized and see all the major events for the month in one place.
*This post contains affiliate links for full disclosure click here
Step 1 Getting Your Supplies


The first thing that you have to do to make anything is to get the supplies. The main supplies that you will need for this project are washi tape and post-it notes. I specifically used Scotch Expressions mint mosaic tape. There are many different types of Scotch Expressions. I saw a cute pencil one that would be perfect for the classroom. I like this tape because it is such a big roll of washi tape. You can also find smaller rolls at your local craft store or on Amazon.
For post-its, I used the Marseille collection. It has a few different colors, but any post-it system will work depending on what colors you want.
Looking back I also think, that clear adhesive pockets to put the post-its in would be helpful. With these adhesive pockets, you could make this calendar into a dry erase that way you don’t have to completely replace the post-its every month. I was not able to find these adhesive pockets, but I have heard they have them in some Target dollar bins. I just used the post-its its and they look awesome.
Step 2 Finding a Place For Your Washi Tape Calendar
You will need a little bit of space for this calendar. I used about three feet of space on the wall above my desk to create it. You need about that much space. There was a corkboard in the space that I wanted. I tried to make them work together, but space was just too small. So I took down the corkboard.
This calendar would be great above a desk in a home office, by the whiteboard in a classroom, or even on a wall in the kitchen. Find the place where you want it, and make sure there is actually enough room there to fit it. Remember about three feet is needed.
Want to Read More?
5 Steps to an Organized Life Using a Planner
How to Make Back To School Organization Easy with Two Stations
How to Pack The Best Teacher’s Bag
Step 3 Making the Washi Tape Calendar
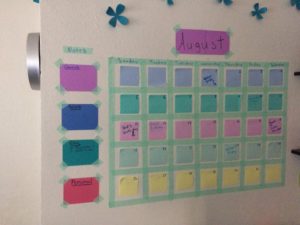
Laying out the tape is the hardest part of the process. You start by putting the top line of washi tape down it should be two feet nine inches across. Then you have to divide that line into seven sections.
The washi tape I used is almost an inch wide so each line should have four inches in between them. Remember to put your first line of washi tape at the very end of the top line. Overall, you should have eight vertical lines of washi tape.
All the lines will be about two feet long. This will divide your calendar into seven sections. You now will repeat the same concept with horizontal lines. They will also be four inches apart. There will be six horizontal lines when you are done.
Once you have all the tape laid out it is time to add the post-it’s. These are easier to place with the tape down, but the post-it adhesive is definitely not enough to make it stick to the wall especially with textured walls. I thought it may be enough at first, but all that left me with was post it’s falling off the wall. So learn from my mistakes put more tape on the back of the post it’s.
If you want you can make the post its all the same color. You can also experiment with the color of the post its rather it be diagonal lines, vertical lines, or horizontal lines. I opted for horizontal lines.
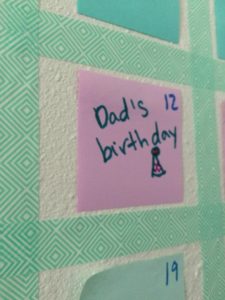
From here all you have to do is write the days down along the top line of tape and write the numbers on the post its. Then you can create the monthly card. I taped together two blank cards together, wrote the name, and chose to only tape it up with washi tape diagonally on the corners. This gives it a more whimsical feel. You could also completely cover the sides of the cards with washi tape.
Step 4 Adding the Extras
Once you have the calendar, you have all that you need to stay organized. It will help you because you will be able to see all of your items for the month in one place. However, you can add a couple of extras if you want. I added two extras to my calendar.
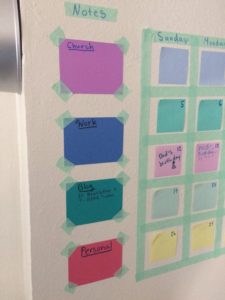
The first extra I added was a notes section. I have four colored cards that I used for my notes. The first card is for church, the second for work, the third for blog, and the fourth is personal.
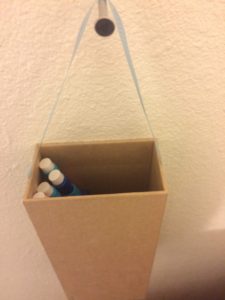
The second extra that I added was a little box to hold pencils. I used part of a box which my glasses came in, which just happened to be perfect for holding pencils. I added a ribbon to it and then hung it on a nail. You should be able to find a little pencil box that is around the same size. If not and you need glasses, then buy some from Eye Buy Direct and you too will get this perfect little box. It is perfect for having a pencil right there to write with when you need it.
Enjoying your Washi Tape Calendar
Now that you have your calendar it’s time to enjoy it. I know that I have enjoyed mine over the last several days. First, it is really cute and second, it is actually useful. I was sitting at my desk today and thought, “I need to put this on my schedule.” Then I was able to reach up and make note of it right away. Although, I will still use my bullet journal as a day to day planner. This one will definitely keep me on track with all the big picture items for the month. If you decide to do this project please comment below with your results.
To buy the supplies needed either click the pictures about or head over to my store. I am an Amazon Affiliate and will make a percentage of qualified sales.
If you enjoyed this article please share it so that other people can benefit from it as well. A great way to do that is Pinterest.