How to Teach Storytelling Techniques

Storytelling is an important skill for students to learn. Not only does it help them develop their creative writing skills, but it also teaches them important life lessons. In this blog post, we will discuss how to teach storytelling techniques in the classroom. We will start by talking about the different parts of a story: exposition, problems and solutions, climax, resolutions, and lessons. Then we will talk about how to teach all of these parts using the plot mountain diagram.
This post may contain affiliate links for full disclosure click here.
How to Teach Storytelling Techniques #1 The Exposition
The exposition is at the very beginning of the story and it really sets up the characters and the setting of the story. It’s important to make sure that your students understand what the exposition is and how to use it in their own stories. A great way to do this is by having them create a storyboard with the different parts of the exposition. They can also incorporate their characters and their setting into their storyboard.
I also really like teaching students the show not tell method when we are working on expositions. I usually show them this video. Then I have them pick a character trait and think through what a character would say, do and look like if they are experiencing that emotion.
You can do a similar exercise to help them establish a setting. You can have them pick a place and say what you see, hear, feel, and smell at this location. You can also have them say what people do at this location this will have them describe their setting instead of just saying they are at the beach. This is very important for the development of the exposition.
One writing activity that could help kids form character and setting is my build-a-treat writing. The items that they build could become a character or part of the setting and that can establish their story. If you would like a free copy of this activity I have it available for my subscribers. Click on the image below to grab this activity.

How to Teach Storytelling Techniques # 2 Problems and Solutions
The next part of the story is called the problem and solution. In this part, the character has a problem that they need to solve. It’s important to help your students understand that the problem should be something that the character can actually solve.
A great way to do this is by having them create a storyboard with different parts of the story. They can then list out possible solutions for the problem that their character is going through and what the steps would be to get to a solution. I really like to show students that there are multiple solutions to any problem and they can use several solutions to help their character solve their problems. No matter what I also make sure that students know there are multiple steps to a problem and they need to explain each step clearly and fully. They can’t just jump to a solution without showing how their character solved the problem.
How to Teach Storytelling Techniques #3: Climax
The climax of the story is the high part of the story where the problem is about to be solved, and the readers are not sure if the solution will work or not. It’s important to help your students understand how to build suspense in their stories.
One way to do this is by having them create a storyboard with different parts of the climax. They can then list out possible solutions for the problem and show how the characters are not sure they are going to work.
The climax of the story usually also contains a lot of action. So it’s important to make sure that your students are describing the action clearly and in detail.
Want to read more?!?!
Strategies for Developing Writing Skills
How to Plan an Essay with Doodle Notes
How to Improve English Grammar in Writing
How to Teach Storytelling Techniques #4 Resolution
The resolution is the part of the story where the problem is solved and everything is back to normal. It’s important to help your students understand how to resolve their stories.
A great way to do this is to teach about the story’s theme. A theme of the story is the lesson that it teaches although the lesson is woven throughout the story it comes to fruition in the resolution of the story. A great way to end the story is to make sure that your students are driving the lesson home.
You can do this by having them create a storyboard with different parts of the resolution. They can then list out how the problem was solved and what the theme of their story is.
I also like to make sure that students understand that the resolution is not always happy. The character might not get what they wanted in the end but they will have learned something in the process.
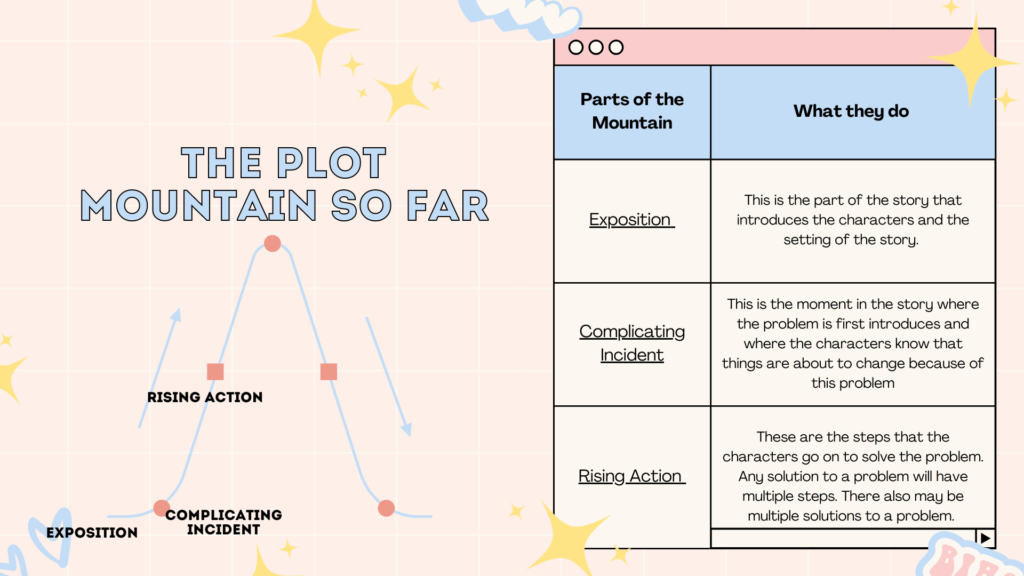
How to Teach Storytelling Techniques #5 Plot Mountains
A great way to lay out and teach all the parts of a story that I have listed above is to do plot mountain activities.
A plot mountain is a diagram that shows all the parts of a story. It’s a great way to help students plan their stories and make sure they have all the elements of a good story.
I like to start by having students create a storyboard with different parts of the story. They can then list out each element on their storyboard on a plot mountain diagram this way they can be sure that they have covered every part of a good story and are not missing anything.

If you don’t want to wrap your head around all these techniques but you still have your kids benefit from learning about the art of storytelling. I have two classes on Outschool that go over these storytelling techniques they are my master essay writing for middle schoolers class and my creative writing class. Head to my Outschool profile to check them out.
What are some of your favorite ways to teach storytelling techniques? Share in the comments below!